Managing Notebooks with the Data Labs Dashboard
Data Labs are notebook environments for developing machine learning code using a customized JupyterLab environment. Jupyter notebooks are a familiar, open source tool to write static text and media alongside dynamically executed code in cells that can be evaluated using a kernel (e.g. Python, R, etc.). Because Aunsight Data Labs are run inside Docker containers on the platform's powerful compute infrastructure, Data Labs are an ideal place to perform machine learning experiments and production-level modeling.
The Data Lab dashboard in the Aunsight web interface provides tools for managing data lab notebooks in the platform. This article shows how to navigate the Data Lab dashboard to view, create, edit, and run notebooks. After reading this article, users should be familiar with how to create and manage notebooks and may wish to learn more about features unique to Aunsight's implementation of the JupyterLab environment itself.
The Data Lab Dashboard
The Aunsight web interface provides a Data Labs dashboard to users who have the AU-DSLAB:view-workspace permission available to them through a role or group they have in a given context.
To access this dashboard, log in to the web interface and select the context you wish to work in through the context selector. From that context, click the "Data Labs" icon (![]() ) in the palette on the right.
) in the palette on the right.
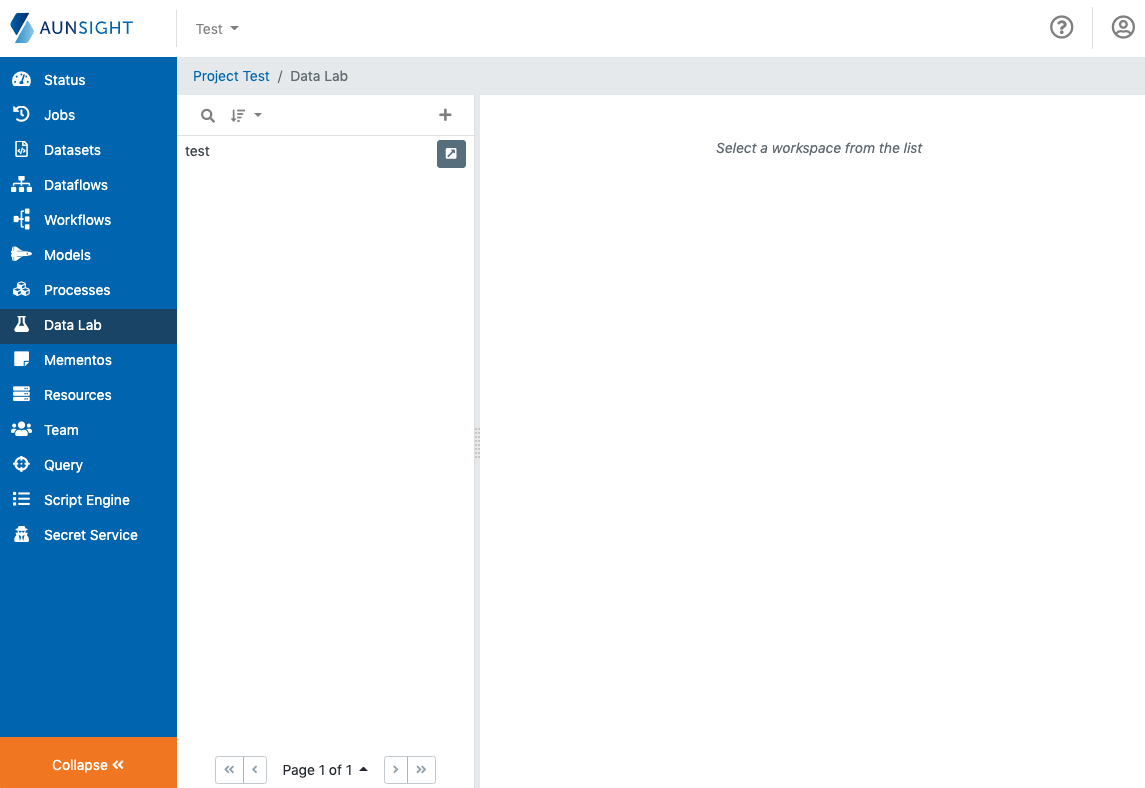
The Data Lab dashboard is a standard list-based view of data lab notebook workspaces available in the present context. You can search (![]() ) and sort (
) and sort (![]() ) the list to find a notebook workspace by clicking the appropriate icon at the top of the list. You can also create a new notebook by clicking the plus icon (
) the list to find a notebook workspace by clicking the appropriate icon at the top of the list. You can also create a new notebook by clicking the plus icon (![]() ).
).
Creating a Notebook
To create a new notebook, click the "plus" icon (![]() ) on the notebook list. This will bring up a notebook creation dialog.
) on the notebook list. This will bring up a notebook creation dialog.
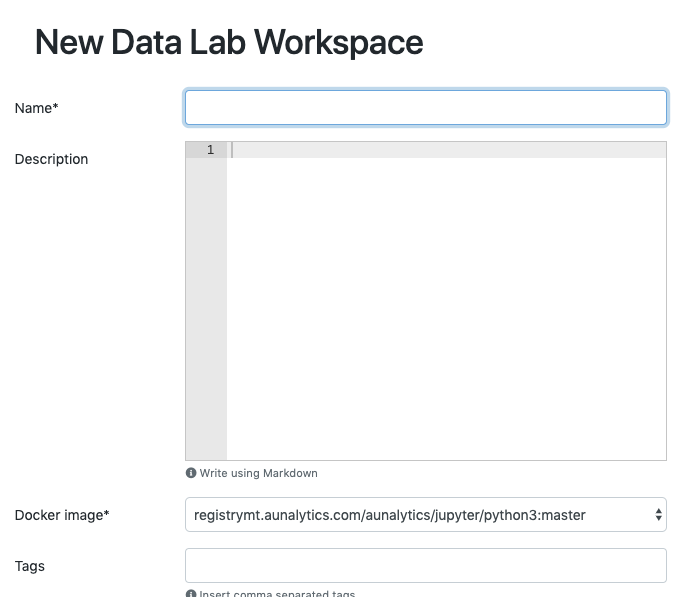
To create a new notebook, specify the desired settings and click the "create" button (![]() ). Notebooks require two settings: name and Docker image field. In addition, the notebook creation dialog has additional fields in three sections that users may wish to configure: Metadata, resource data, and attached storage.
). Notebooks require two settings: name and Docker image field. In addition, the notebook creation dialog has additional fields in three sections that users may wish to configure: Metadata, resource data, and attached storage.
Create Datalab Metadata
To create a notebook, one need only specify a name and Docker image for the datalab.
-
The Name serves as a human-readable identifier for the notebook.
-
The Docker image field is selected from a drop-down box. Selecting a specific Docker image (e.g.
Python3:master,tensorflow:master, orr:master) will determine the kernel(s) and features available within that Jupyter notebook.
In addition to the name and Docker image field, there are additional settings that you may wish to specify:
-
Description The description field is a text field that will be used to generate the notebooks's description text. Though the field accepts only plain text, it will render markdown formatted content as rich text. The description field can be edited at any time after the process is created.
-
Tags Notebooks can be labeled and grouped by tags (32 character limit) that allow users to easily identify groups of related objects (dataflows, workflows, datasets, etc.) that are used together. Tags can be changed at any time by editing them via the notebook record view.
Specify a Compute Resource
Data Lab notebooks run within an Aunsight compute resource. Aunsight allows users to specify a resource and even adjust the memory and CPU allocation limits applied to their data lab notebooks running on that resource.
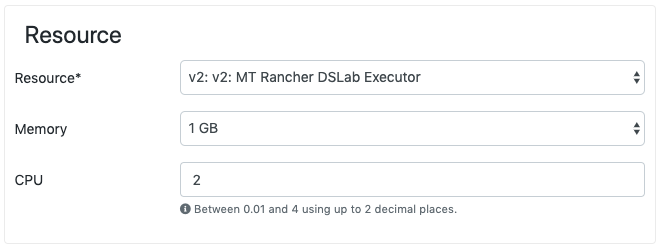
Users can select a compute resource from the dropdown list and adjust the resource allocations by the quarter gigabyte of RAM and the CPU limit as a percent of up to four cores (i.e. a two-decimal place number between 0.01 and 4.00).
Specify Storage Volume(s)
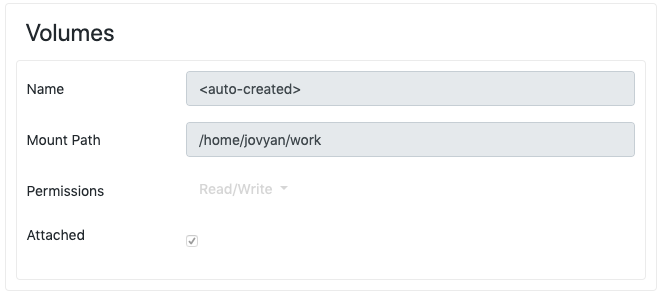
Data lab notebooks also have the ability to store data persistently using NFS volumes mounted in the container. By default, Aunsight creates a new volume for each data lab mounted at /home/jovyan/work/. In the future, this section will allow users to mount additional volumes and configure sharing permissions so that more than one notebook can access data on a volume.
Viewing and Editing a Notebook
Clicking on the name of a data lab notebook in the data lab list view brings up that notebook into the main window where users can review details and perform actions on the metadata record for that notebook.
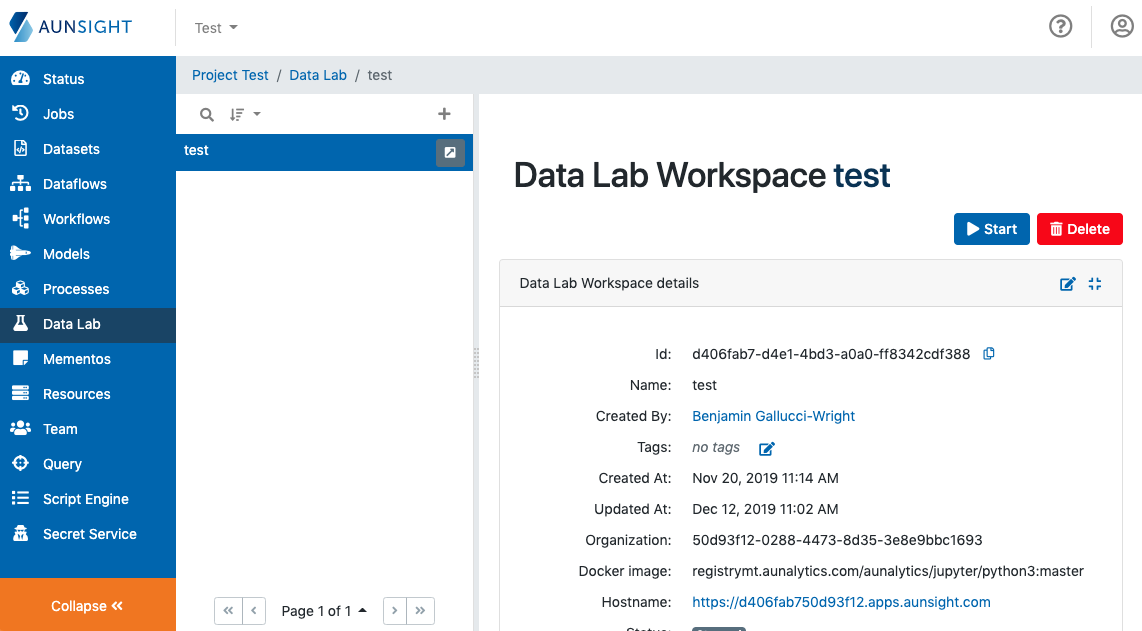
Data lab notebook records are displayed in a single page grouped into three sections: details, resource usage, and activity history. In addition to data, the notebook records page exposes controls for starting and stopping and opening the notebook in the Jupyter web editor.
Notebook Details
The first section, "Details," displays basic information about a data lab notebook.
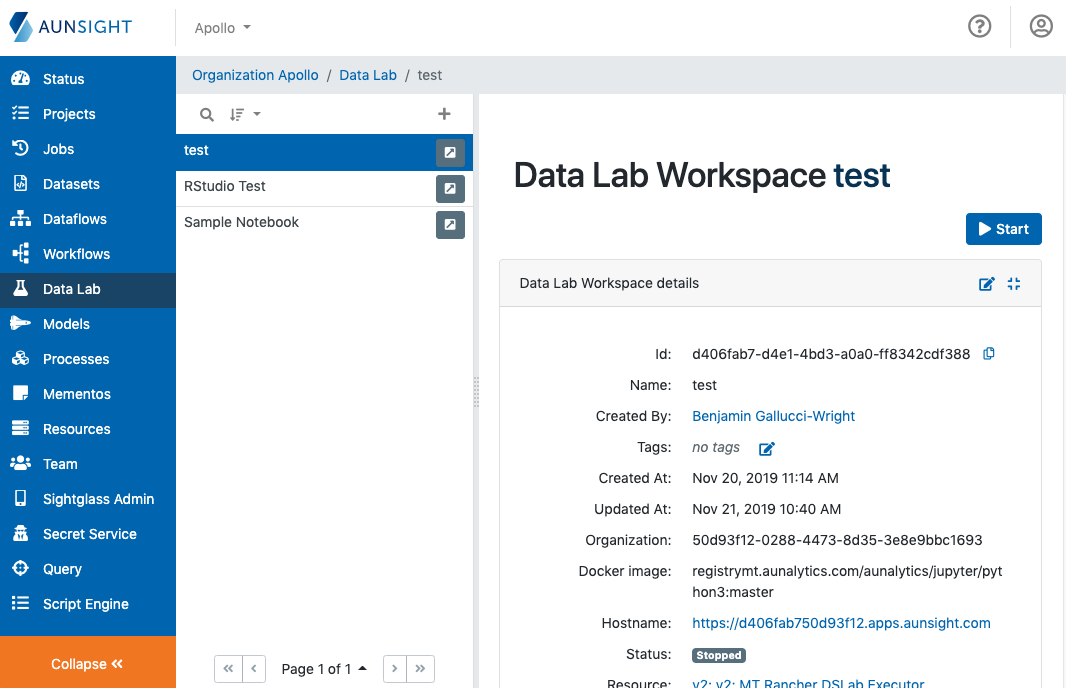
The data fields contained in the details section include:
- Basic metadata such as:
- ID
- Name
- Description
Note
To edit the name, description, or tags, click the edit icon (![]() ) in the upper right corner of this section.
) in the upper right corner of this section.
-
System metadata such as:
- Creator
- Tags
- Creation/Modification dates
- Context
-
Compute related metadata such as:
- Docker base image name
- Docker host URL
- Status
- Hosting Compute Resource
- Resource Allocation Limits
Resource Usage
The resource usage section displays a graph of resource utilization from the notebook over time. Model development can often be a resource intensive task so monitoring the resource usage can be helpful in making decisions about scheduled training and resource allocation. The resource usage graph can be viewed by moving the mouse cursor over points of interest to display memory and CPU levels at a given point on the timeseries.
Activity History
The activity history section displays a searchable and sortable log of notebook activity. Notebook start and stop events can be monitored here to see when a particular notebook was running.
Starting and Stopping a Notebook
Notebooks run in Docker container images prepared with JupyterLab servers, Jupyter kernels, Aunsight SDKs, and other tools. Because containers can store data persistently in attached volumes and be restarted, the data lab dashboard allows users to issue commands to start or stop a notebook.
Warning
Only data saved to a mounted Docker storage volume (such as the notebook content itself) is persisted. Packages installed by the user (such as Python packages installed by pip) do not persist between container restarts. For this reason, it is recommended that such files and packages be tracked in a requirements.txt file or its equivalent, and proper documentation of these startup routines be stored somewhere so that future users can replicate the development environment in the case of container restarts.
The current state of a notebook can be inferred from the presence of "start" ( ) or "stop" (
 ) buttons in the upper right corner of the data lab notebook record.
When a user starts a stopped data lab, the web interface will present a dialog for the user to select a base image and specify a compute resource and allocation limits for that instance of the data lab.
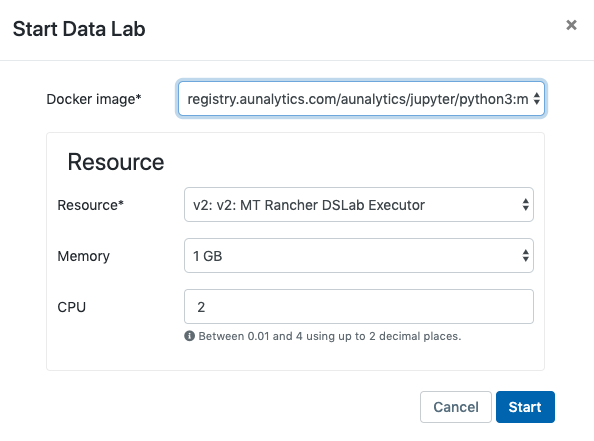
Tip
Users can stop and restart a datalab to change resource allocations and even the Docker base image for their data lab.
Spinning up a data lab can take up to several minutes depending upon resource usage levels at the time. During this period, users attempting to access the server hosting the notebook will receive an HTTP 503 (Service not available) error. This message should go away when the notebook server has initialized.
Note
It can take up to several minutes for Aunsight to start up a Jupyter Datalab server within a container. During this start up time, users will receive an HTTP 503 error message when attempting to access the server.
Deleting a Notebook
To delete a notebook, click the "delete" button (![]() ) in the upper right corner of the data lab notebook record. This will bring up a prompt to confirm deletion of the notebook and its associated metadata.
) in the upper right corner of the data lab notebook record. This will bring up a prompt to confirm deletion of the notebook and its associated metadata.
Warning
Notebook deletion is irreversible!
Opening a Notebook
Data Lab notebook records contain metadata about the data lab notebook, users must open a running notebook in the Jupyter web application. If the notebook is not already running, start the notebook and wait for it to complete its initialization. This will be indicated when the status field in the details section shows the data lab as Running. Once the notebook is running (or if it is already running) click the hostname link in the details section of the record, or click the external editor icon (![]() ) next to the name of the data lab in the list view.
) next to the name of the data lab in the list view.
Either method will open a new browser tab with the Jupyter datalab environment for this notebook. To learn more about how to use these notebooks with the Aunsight platform, read the Jupyter notebook features article.