Managing Datasets
The Aunsight web interface provides a workspace for managing Aunsight datasets. This tutorial shows how to browse the list of datasets and edit a dataset's Atlas record metadata. If you are not familiar with what datasets are and how Atlas records store metadata about them, read the datasets overview before this exercise. Once you have some familiarity with the basics of editing a dataset through this article, you may want to explore further topics like creating a new dataset, ingesting data into a dataset, setting up a schema, or browsing and reviewing the data stored in datasets.
The Datasets Workspace
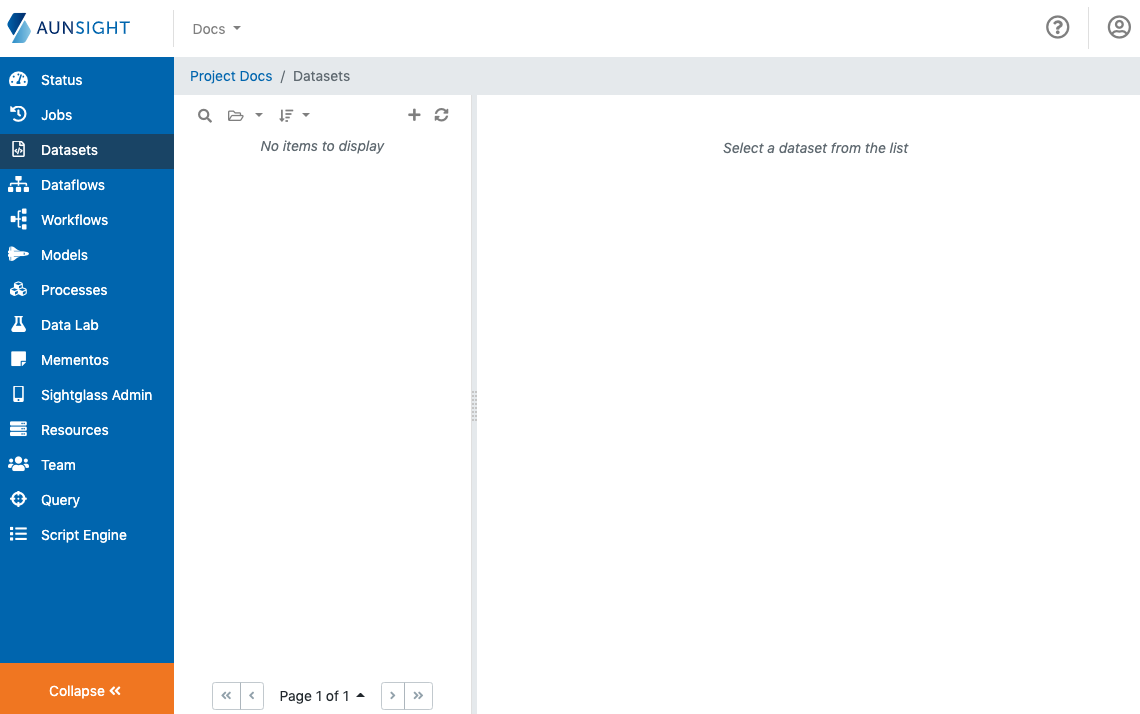
The Aunsight web interface exposes tools for working with Datasets and the Atlas records that describe them in the Datasets workspace which is accessible to users who have the AU-ATLAS:view-any-record permission available to them through a role or group they have in a given context.
To access this workspace, log in to the Web interface and select the context you wish to work in through the context selector. From that context's dashboard, click the "Datasets" icon (![]() ) in the palette on the right.
) in the palette on the right.

The datasets workspace is a standard list-based view of datasets available in the present context. You can search (![]() ), group (
), group (![]() ), and sort (
), and sort (![]() ) the list to find a dataset by clicking the appropriate icon at the top of the list. You can also create a new dataset by clicking the plus icon (
) the list to find a dataset by clicking the appropriate icon at the top of the list. You can also create a new dataset by clicking the plus icon (![]() ) or refresh (
) or refresh (![]() ) the list if changes made by another user are not appearing on the list.
) the list if changes made by another user are not appearing on the list.
Dataset Records
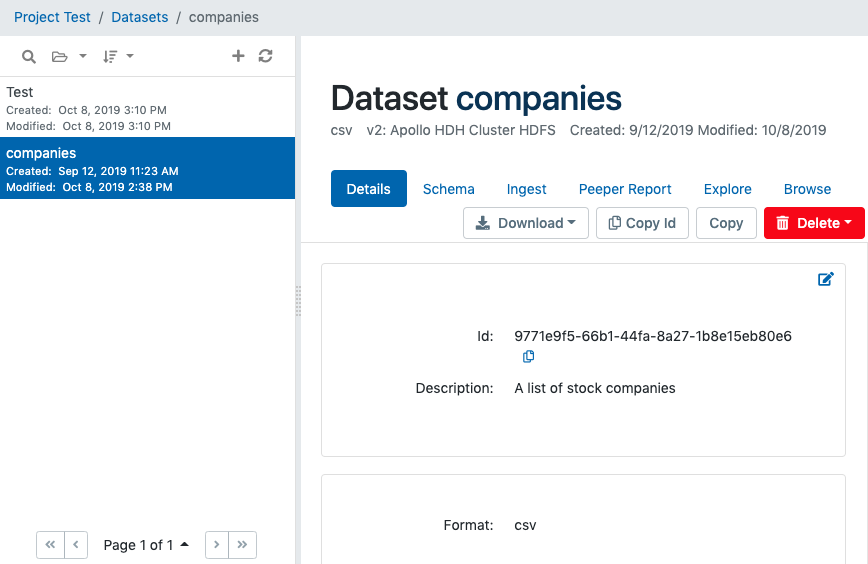
Clicking on the name of a dataset brings up that dataset into the main window where users can review details and perform actions on the Atlas record.

The web application interface displays Atlas record information and tools in several tabs dedicated to group similar information and functions logically. Additionally, the record view has a group of action buttons that perform tasks relating to the dataset record as a whole.
Details Tab
By default, Aunsight displays the "Details" tab where basic information about a dataset can be reviewed and edited.
Metadata
-
The first section of the details tab displays basic metadata for the dataset, such as ID and description of the dataset, and any tags it may have (Dev mode, solution, and custom tags).
-
The format section displays information about the dataset's file format (e.g. CSV, TSV, JSON, etc.).
-
The access section displays information about the resource, file path, and access and modification dates for the file storing this dataset's records.
To edit thev information in these sections, click the edit icon (![]() ) in the upper right corner of the section to make desired changes.
) in the upper right corner of the section to make desired changes.
Context
The context section displays information about the ownership of the dataset. A dataset's primary owning contexts (organization and project) are displayed as well as any other contexts with which the dataset is currently being shared.
Sharing Datasets
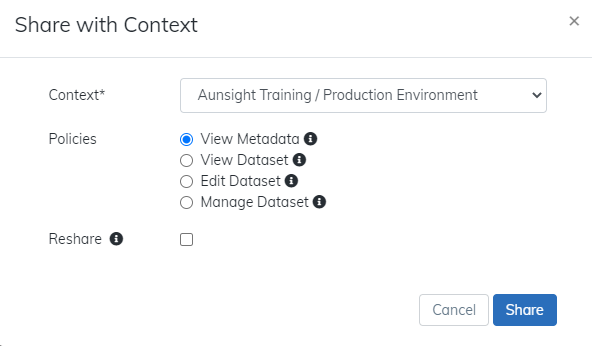
From the project containing the dataset you wish to share with another project, click the +Share with new context button. The Share with Context dialog opens. Use this to define the desired sharing.

- Select the Context (organization/project) to share the current dataset to. Available contexts are based on your access.
- Select the appropriate policies. Policies are what the shared to context can do with the shared dataset.
- View Metadata – provides the ability to view the metadata, but not the actual dataset data itself.
- View Dataset – gives the ability to view the metadata and dataset data as read-only.
- Edit Dataset – grants the ability to view and change the dataset’s data and metadata.
- Manage Dataset – allows the ability to view, change, or delete the dataset’s data and metadata.
- Checking the Reshare box permits the context receiving the share to share the dataset record with other context.
Activity History
The activity history section displays a searchable and sortable log of dataset activity that shows the event, the service that created it, and the created date/time. Examples of services you may see are AU-TOKAMAK, AU-ATLAS, AU-METRODISPATCHER.
Click any row to display more detail about the event. Click any blue text in the Event Details dialog to be taken directly to that job, organization, project, output, input, etc.
Schema Tab
The schema tab allows users to view, design, and edit schemas stored in the Atlas record for the dataset. Schemas are natively stored as JSON objects, but Aunsight provides two different ways to view schemas: Guided mode, and raw JSON. Additionally, the schema autodetector can help determine a schema by analyzing a sample of raw data. To learn more about schemas, read this article.
Ingest Tab
The ingest tab allows users to ingest or import data into Aunsight by uploading a file or by directly entering data using an editor in the web interface. To learn more about importing data, read this article.
Peeper Report, Explore, and Browse Tabs
The datasets workspace allows users to view statistics about the structure of their data as well as browse the actual underlying data itself via the Peeper Report, Explore, and Browse tabs. To learn more about these tools, read this article.
Dataset Actions
In addition to the features contained on the tabs of the Datasets workspace, an action button group provides tools that affect the entire dataset.

Download
The download button will download a copy of the entire dataset in the same format as it is structured physically on the platform infrastructure. For example, a CSV file will be downloaded as a CSV file, JSON as JSON, and so forth. Users have the option of downloading the dataset with or without its header row.
Note
Downloading a dataset only downloads the data contained in that set. To copy the contents of an Atlas record (e.g. schema, tag attributes, etc.) use the copy action button.
Copy ID
Copy ID will copy the dataset ID to the clipboard. This is useful if you need to refer to the dataset in a script, workflow, or via the Toolbelt command line interface.
Copy
The Copy action button allows the user to copy the current dataset, either as a new dataset, or to overwrite another.
Copying a dataset as a new dataset is exactly like creating a new dataset only the new dataset will automatically be populated with the data and schema from the source dataset. This can be useful if you need to migrate a dataset to a different storage resource, create a different version of a dataset, or create a backup copy before making irreversible changes to the original.
Copying a dataset to an existing dataset allows you to write data from one dataset into another dataset. From the "Copy Dataset" dialog, select "Existing dataset" and choose a dataset either by pasting the resource ID or browsing for the dataset.
When copying to an existing dataset, you can also choose whether you wish to copy the source dataset's schema to the target as well. To overwrite the target dataset's schema, check the "Copy Schema" box.
Warning
Any updates to a dataset schema are permanent. Always make sure you have made a backup of the previous schema before making changes to any dataset schema.
When writing to an existing dataset, you can choose to "overwrite", "append," or "create" the dataset records. As these names suggest, it is possible to append the source after the existing records in the target, or simply wipe the data from the target and replace it with the data from the source.
Warning
Changes to datasets are permanent and cannot be reversed. Exercise caution when overwriting datasets.
If you recently created a blank dataset, the literal file for storing data may not yet exist on the Aunsight platform infrastructure. In this case, you can choose "create" to only write if the file has not been created. This can be useful if you intend to copy data to a new file, but want to be sure that you don't accidentally overwrite an existing dataset.
Delete
The delete action button allows you to delete the dataset record in one of two ways.
Delete Data and Record allows you to delete both the data within a dataset and the underlying Atlas record that manages the data.
Delete Data Only will only delete the data in a dataset; it will not delete the Atlas record, allowing you to continue using that record to store new data by ingesting or copying data from an existing dataset into it.